Blog
Prismatic vs. Opal: How to Choose the Right Ceiling Light Diffuser Panel for Your Space
Prismatic vs. Opal: How to Choose the Right Ceiling Light Diffuser Panel for Your Space Replacing an old fluorescent light diffuser is one of the

If you’ve ever tried replacing a ceiling light cover and ended up surrounded by tools, step ladders, and frustration, you’re not alone. But not all lighting upgrades have to feel like a full-blown renovation project. Some can be refreshingly simple—like installing wraparound light covers without tools.
Wraparound light covers are one of those unsung heroes in commercial and residential lighting. They’re efficient, practical, and—when chosen well—visually seamless. And the best part? With the right kind of wrap lens, you don’t even need a screwdriver to install or replace them.
In this guide, we’ll walk through everything you need to know to install a wraparound light cover the easy way—no drills, no fuss, just clean light and quick upgrades.
")
A wraparound light cover (often called a wrap lens) is a type of diffuser that, well, wraps around the lighting fixture. Typically used in fluorescent and LED fixtures, it covers the light source from the bottom and both sides. It’s usually secured using a lip or ledge at the top of the fixture frame, which the cover snaps into.
You’ll often see wrap lenses in:
But they’re popping up in more home renovations, too—especially in kitchens, basements, or utility areas where clean, even lighting is needed.
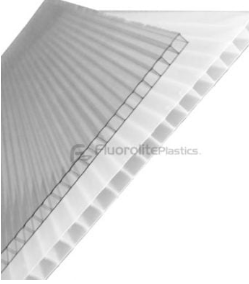
Not all wrap lenses are created equal. Here’s a quick breakdown of the most common materials:
The go-to for most fixtures. It’s lightweight, strong, and resists yellowing over time. Acrylic is ideal for tool-free installs because it’s easy to snap into place without warping.
Even tougher than acrylic, with better impact resistance. Often used in areas where lights might get bumped or where safety is critical.
These are textured to diffuse light more evenly and reduce glare. Great for office spaces and commercial setups.
Used when you want a cleaner, minimalist look or directional diffusion.
Each type has slightly different flexibility and strength, which affects how it behaves during installation.
Okay, let’s talk prep. Even if you’re not using tools, a little setup goes a long way.
Most tool-free wraparound installs don’t require more than your hands, but you might want:
Light covers, especially older acrylic ones, can crack if twisted or bent too much. Always:
Here’s where the magic happens. Most wraparound light covers can be installed or replaced in 5–10 minutes flat.
If you’re replacing an existing wrap lens:
That’s it—set it aside carefully.
Hold the new wraparound cover with both hands, lining up the long edges with the fixture’s sides. Make sure the lens isn’t flipped—the open ends should match the fixture’s layout.
Give the lens a gentle tap or wiggle—if it doesn’t shift or rattle, you’re golden.
Even though this process is tool-free, some hiccups can still come up. Here’s how to handle them.
Solution: Double-check that you’re starting with the correct side. Some fixtures have a slightly deeper groove on one edge that needs to be installed first. Also, make sure you’re pushing near the ends of the lens—this gives you better leverage.
Solution: This is usually due to age or heat damage. If it’s a plastic lens, it might be warped. Try flipping it around or replacing it entirely with a newer model.
Solution: Stop immediately. You might be forcing it too hard. Gently lower the lens and examine the edges. If there’s visible cracking, it’s safer to replace it.
Proper maintenance keeps your wrap lenses looking great and your lighting efficient.
Periodically (maybe once a year), give the lens a gentle tug to ensure it’s still securely in place. Over time, heat or slight warping might loosen the fit.
Tool-free installations aren’t just convenient—they’re smart.
Swapping out old covers for fresh ones takes minutes, not hours. Great for commercial maintenance teams, property managers, or even DIY homeowners.
Without screws or brackets, you reduce the chance of stripping threads, losing parts, or damaging mounts.
You don’t have to be an electrician—or even particularly handy—to install a wrap lens this way. It’s all about thoughtful design and solid engineering.
When you can remove and reinstall a light cover in seconds, cleaning and inspecting your lighting becomes way easier.
")
Lighting upgrades don’t have to be complicated—or expensive. Installing a wraparound light cover without tools is one of the simplest ways to refresh a space, improve lighting quality, and keep things running smoothly without calling in a contractor. Whether you’re managing a commercial property, updating a home workspace, or just replacing an old, cracked lens, tool-free wraparound covers offer a clean, quick solution.
The best part? You can do it in under 10 minutes. No screws. No fuss. Just a bit of care and the right cover.
For those looking to replace aging or damaged lenses with easy-to-install, high-quality options, Fluorolite Plastics offers molded light diffusers, vapor-tight covers, and custom-fit wrap lenses designed with durability and convenience in mind. With over four decades of experience supplying both commercial and residential lighting solutions, it’s a reliable resource when you’re ready for better lighting—without the hassle.
Efficient lighting shouldn’t be a project. Sometimes, it’s as simple as snapping in the right cover.
Most modern wrap lenses are designed for tool-free installation, especially those with built-in lips that snap over the fixture’s frame. Older fixtures may still require clips or screws.
Measure the length, width, and depth of your existing lens—or the fixture itself. If you’re not sure, contact the manufacturer or supplier with your model number or photos.
Technically, yes—some acrylic lenses can be cut with a fine-tooth blade. But it’s risky if you don’t have experience. Best bet is to order a custom-fit replacement.
Acrylic is lightweight and fairly forgiving, which makes it a popular choice. Polycarbonate is tougher but can be harder to flex without tools.
Absolutely. Many are specifically made for LED retrofit kits or new LED fixtures, and help diffuse the brightness evenly across a room.
Yes. Look for vapor-tight or gasketed wrap lenses, which are designed to keep out moisture, dust, and insects. These are often used in industrial, kitchen, or garage setups.
Every 5–10 years, depending on the environment. If it starts yellowing, sagging, or cracking, it’s time for a new one.
Wrap lenses made for simple, tool-free installations are available through U.S.-based suppliers offering molded light diffusers, LED-ready covers, and vapor-tight solutions. Fluorolite Plastics manufactures long-lasting lighting replacements designed for commercial, industrial, and residential spaces—and specializes in easy-install lens options backed by decades of experience.
Prismatic vs. Opal: How to Choose the Right Ceiling Light Diffuser Panel for Your Space Replacing an old fluorescent light diffuser is one of the

Tired of Glare? Why Plastic Egg Crate Louvers Are the Solution for Comfortable Lighting Walk into any modern office, school, or large commercial space, and
Beyond Lighting: 5 Creative & Practical Uses for Thin Acrylic Sheets When people hear “Plexiglass” or “Acrylic,” their minds often go straight to lighting diffusers